
The study of methods for creating an animated, interactive Product that teaches sign language for children and researching the Industry surrounding such a product.
Aim
The Aim of my Research project is to find out the basic anatomy of a Human hand and how to create an animated interactive product that teaches young deaf/hard of hearing children sign language and weather it is needed on the market.
Introduction
The hands are an essential part of everyday life. We use them to aid us in many things such as cooking, cleaning, carrying, entertainment and communication. In fact for deaf people Sign Language is the most important form of communication. Children who are born deaf are at a serious disadvantage in life and it wasn’t until I was at a family party when I was trying to show my deaf younger cousin some of my animation work that communicating with him was very difficult. I began to think about it and discuss methods of teaching sign language with his parents and an animated product seemed like a really good idea. Until this project I haven’t thought much more about it but for this product I will be creating an Interactive media CD ROM that teaches deaf communication. Learning sign language is essential for deaf people and I believe with an interactive animated product I can make it easier and more fun. My product will be specifically aimed at children of a young age and will be highly visual. I like that I can stylise this product in a cartoon fashion that appeals to children as it makes it holds more possibilities. The initial idea is to create two animated hands which will assist words, phrases and 2d animated images that will help define the sign. As a product I think this has a lot of potential and can go international. I intend to use this report to find out the best techniques for building and rigging and animating 3d hands and the methods needed for teaching sign language. Also I will need to research the software I am able to use.
Research aims
§ Find out and analyse the best way to model my product,
§ Find out and analyse the best way to rig my product
§ Analyse ways in which the hand can be animated and how it is done so in industry
§ Study the anatomy and movement of the Human hand
§ Research a variety of similar products already on the market and take away the best components of each.
Study the Anatomy and Movement of the Human hand
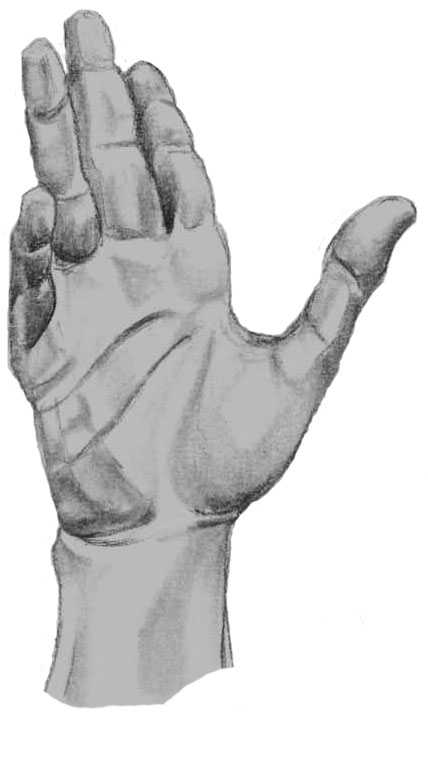
To create something real, like a section of the human anatomy, it is extremely helpful to gain knowledge of the mechanism behind the object (animate or inanimate). For a sign language product it is necessary to learn the muscles and structure to the hand and how they work. It can be valuable information when it comes to modelling, rigging and animating the product. It will help when creating mesh, bones and moving the hand. Knowing the limits of a hands movements and finding out what is possible and not possible can be the difference between realistic movement and just an okay animation. Being able to refer to different muscles as you work can make life easier also, so it is generally recommended that you know or can reference muscle names.A great way to learn this sort of information is to draw examples of whatever you’re researching. You learn much faster visually than by reading text.
The first drawing of the hand shows the bones of the hand and the basic sections of it. The base of the hand is made up of eight bones and group together to create the ‘carpus’ section. These are called the carpals. The next section of the hand is the ‘metacarpals’ which are connected by the muscles ‘Dorsal Interosseous’. These muscles are linked in conjunction with the ligament attachments so that they can perform with the major wrist actions. (See drawings below)

The phalanges make up the fingers. There are three types of phalanges and each finger is made up pretty much the same. These phalanges sections are the ‘proximal phalanges’ the ‘intermediate phalanges’ and the ‘distal phalanges’. The individual metacarpal movement is very limited and position is arched to form the palm. The phalanges can all extend and flex at a hinge joint (knuckle) and the distal phalange is parented to the intermediate phalange. The ligaments run all the way down the hand and attaches at the distal end of the phalanges, this acts like an elastic band and helps create the movement at the hinge joint. The thumb is different to the fingers as it does not have an intermediate phalange and can move much more. (See drawings below)


The wrist action is primarily allowed by the muscles in the forearm and many tendons that intersect them and attach to the bones of the hand. The flexor muscles run down the inside of the forearm. They originate from the lateral parts of the ulna. The thumbs movement also starts in the forearm however these muscles start half way down radius and ulna in the distal region. The tendons are a very intricate part to body movement and the hand is made up of many tendons that run through tunnels in the carpals. There are two sets of tendons and muscles, the extensor sections which extend body parts and the flexor section which helps flex the body parts. The extensor tendons run through the metacarpal and phalangeal regions before attatcing to the distal part of the bone. (See drawings below)


Once a basic structure of the hand is learned, it is then important to discover the way a hand moves. The video below shows the hand moving in various ways. References like this show elements of muscle, tendon and skin movement and also how other finger react to specific or singular finger movements. This will help in creating a more realistic final product. for example video shows that as the little finger moves, the finger next to it movers with it slightly. Also the palm has many creases and the muscle connecting the thumb to the palm (abductor porcillis brevis) moves into the palm with it. The hinge creases at the knuckle joints and the metacarpal joints are important to note as these need to be considered when creating the product. A creaseless hand would look very unrealistic, so a way to add these in needs to be found when creating the product, whether it be building it into the mesh or changing vertices weights when rigging the mesh. (see video below)
Grasping objects is an essential type of hand movement. This is also known as prehension, knowing the types of movement helps when animating a product. Below are the six main types of prehension as defined by German scientist G.Schlesinger, (see drawings below)

Here are a look at some further drawings of hands that helps study the positions and shapes of them.


Below are two links, one with all the names of the muscles within the forearm and hand that are also written on the drawings.
Find out and analyse the best way to model.
There is no particular right or wrong way to model just techniques and methods that make it easier. There are several ways to model in 3DS Max such as standard box modelling, extruding splines and nurbs&curves. A good way to create the hand is to model a base mesh in 3DS Max and take it into Zbrush 4.0 where it can be remodelled and more detailed added as it is much more advanced modelling software. Standard box modelling is the basics of modelling. The main techniques used are ‘extrude’ and ‘bevel’. This incorporated with the move, scale and rotate functions can shape an editable poly into a basic shape of any sort. The hand is a complicated shape to model straight off however if approached in stages can create some good results. The first thing to create is the ‘base mesh’. It’s important to section your polygons to make it easiest to create a simple mesh. For example creating four polygons across the top of the box gives a good start to extrude fingers from them. (See photograph below)
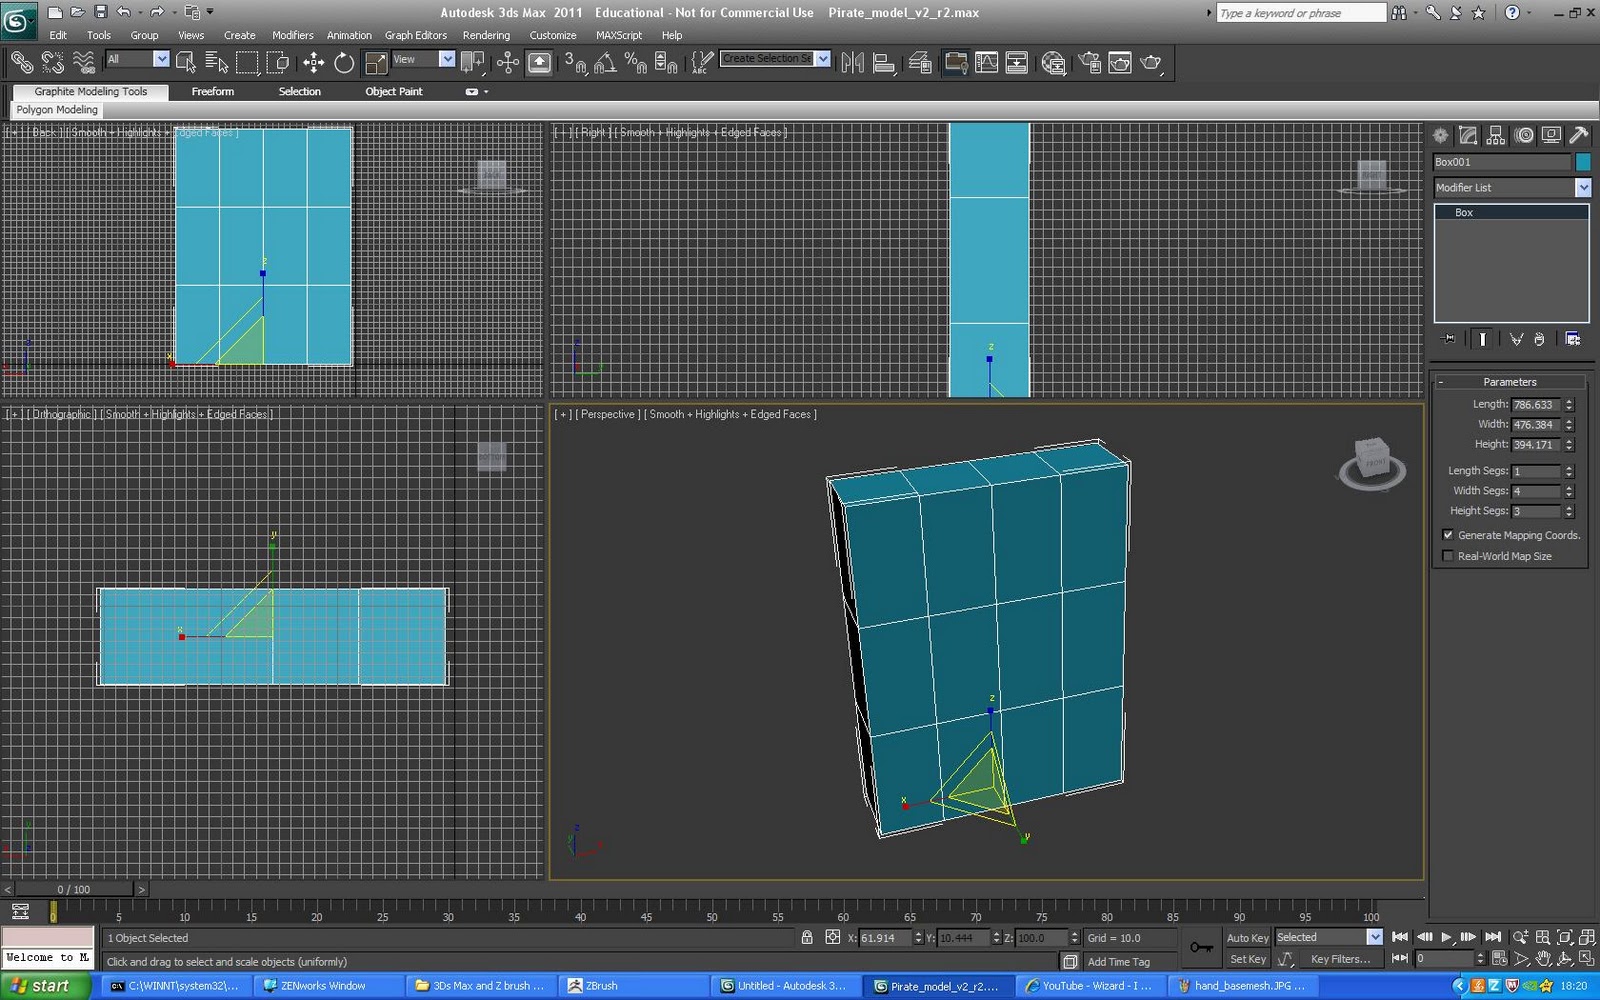

Keeping the fingers extruded separate makes it easier for them to keep their box form. You will find if you extrude all of the polygons together you cannot separate them into fingers. Extrude three times so that finger links are created. This makes it easier when it comes to rigging the mesh. Also the arms play a key role in helping communicate so at least a forearm would be necessary if this product where to work. (See photographs below)

That’s pretty much a successful base mesh. Next step is to export the file as an object (.obj) file and import it into Zbrush4.0.
Zbrush is an advanced modelling software which allows you to sculpt a model with a lot more freedom than 3DS Max. All of the tools have their own importance however the move, clay and clay tubes tools can be used to make high quality models. It is a good idea to keep the poly count as low as possible so that it is easier to rig and render. They clay tools are extremely valuable when it comes to adding mass in specific areas such as knuckles. The ‘reverse clay’ also helps to create creases of the skin really well. When you divide the base mesh into more polygons, you make it easier to sculpt with and gain more control over specific areas. It is important to model from reference when creating something realistic because most people don’t actually remember all the finer details of an object even if they see it as often as people see their own hands. For a product aimed at children a more visually cartoony style has proved to work for most interactive teaching programmes. This is through shows such as ‘Teletubbies’ and ‘the tweenies’ etc. Therefore this product would benefit more staying ‘cartoony’. In industry it is the modeller who makes life easier for the rigger as a result it is important to think about how your modelling technique will affect the next stage of the pipeline. (See photographs below)


Spline modelling is good for modelling certain things but more difficult for modelling others. For example a car or some kind of machinery would be good with this technique. It misses some of the finer detail with human anatomy though, unless you spend a vast amount of time moving vertices which can be sculpted in a couple of hours on Zbrush. It’s always best to start spline modelling around a picture reference (see photograph below)

Then you extrude the spline and bridge the areas around it creating the basic hand shape. Note that when bridging the polygons you are best to keep the same amount of polygons for each bridge so they stay in loops. This is beneficial when it comes to rigging. When you start moving edges and vertices a shape begins to take form however can be quite rough. The base spline always represents how the extruded spline will look. The final touch, which technically could be classed as a cheat however is good to finish off any rough areas, is a mesh smooth modifier. This leaves the hand looking more like skin and less like rock. (See photograph below)


Zbrush is an industry recognized software and is more than capable of building this product. It is designed and built by artists for artists so is now one of the leading software’s for creating models for film and games. Examples of movies and games that it has been used on are Avatar, Lord of the rings, Pirates of the Caribbean, Assassins Creed and Gears of war. Zbrush has revolutionized the way in which artists can model.
Link to the Zbrush Industry page
3DS Max is capable of creating similar quality products, however is a soft ware used for more than just modelling. It has an array of tools that contribute to special affects and actual film making. It can also build models and it is a road to go down when creating a product such as mine, however Zbrush would be the better software to ultimately use when modelling a character/part of a character.
2009 Show reel, examples of 3D studio Max capabilities.
In conclusion modelling is a practice makes perfect kind of skill. You could probably get a similar result using both techniques however for modelling the anatomy the most efficient way is to create a base mesh in 3DS Max and then take it into Zbrush to refine and sculpt the finer details. Spline modelling has its advantages like that you can work straight from referencing and could be even used to create a more accurate base mesh. It is more time consuming than box modelling but the results are often well worth it.
Find out and analyse the best way to rig my product.
The software 3d studio max is a good programme to rig a mesh. There are a few ways to go about rigging a hand using 3DS Max and one of those methods is using the biped which is a default skeletal structure within 3DS Max. Some things are editable such as the number of fingers and toes, and finger and toe links. The hand needed five fingers (including a thumb) and three links. The technique used for rigging anything is to fit the bone structure within the mesh as accurately as it can be to the real life organism. This sets you up for an easier rig. The hand and forearm of the biped fit the mesh like a glove once the bones are moved and re-scaled. This is a simple way to create bones as they are already there for the user; its disadvantage is that it is very limited. (See photographs below)


Once bones are in place there are several modifiers that can be used to apply the “skin” affect to the bones. Physique is a technique that is becoming obsolete but it’s a method worth testing. Once the modifier is applied and initialized then it’s a case of altering ‘envelopes’. These envelopes are basically rings which circle the bone and any vertices on the mesh caught within the ring gets attached to the bone. This technique is quite restrictive as the envelopes can only pick certain vertices close by and tends to pick vertices that are not wanted to be picked. There is a way to overcome this but it’s not completely effective. Locking unwanted picked vertices and editing the strength and fall off of envelopes can relief a lot of the pull on vertices however doesn’t completely let it go. (See photographs below)


A further rigging technique to be used is to use ‘bones’. It is very different to the biped and gives a lot more freedom as the bones can be placed wherever needed. More knowledge of the anatomy of the hand is needed here than with the biped as there are no guides as to where the bones should be allocated. The bones method is very useful to an experienced user however amateurs can run into all sorts of problems. The bones need to stay parented and link in the correct order or else the skeletal structure does not work. For example with the hand, if you parent the tip of the finger to the palm of the hand, whenever the tip of the finger moves the palm will move with it. I would say the study of anatomy of the human or animal figure is necessary when using bones. (See photographs below)


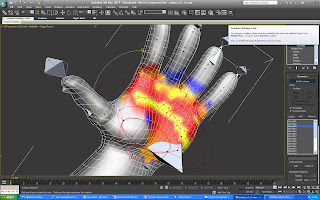
Another way to achieve the skin affect is to use the modifier skin which is now the most recognized and used method of rigging characters. The skinning method allows for picking individual vertices and giving it a particular strength or ‘weight’ and applying it to specific bones. So if a vertices has a low weight on a bone, it will only slightly move when that bone does however if it has a heavy weight, it will move fully with the bone. In terms of picking vertices there is a lot more freedom in the form of the ‘paint weight’ tool. This tool is valuable and allows you to pick any missing vertices and apply accurate falloff to bones. This is oppose to the physique method whereby you pick and lock vertices and have to alter strength of the envelopes. (see photograph below)
In conclusion the two techniques are both useable to a degree, but keeping up with the progressing technology is very important in today’s fast evolving animation industry and there for the skin and bones method would be most beneficial in the long run. It is easier to skin and it gives more realistic results. The bones are harder to use but with practice are soon manageable providing you have a basic knowledge to the human anatomy.
Research a variety of similar products already on the market and take away the best components of each.
The link below takes you to the top page of amazon.com, where most people visit to buy products of this nature. As you can see they are all books and fairly cheap. This leads me to believe that products such as ASL animations and Sign Smith Studio are bought by schools and teach to a wider audience than a one on one situation. This would be something to consider when marketing the product.
Reviewing products on the market
There are not many quality animated products out there that teach sign language. One company that seems has created the technology for companies to use is Vcommunicator 3D. This link will take you to their home page.
They have been established since 1997 and since then have become the leader in creating multi cultural virtual characters that communicate, teach and train people through sign language. They use green screen and motion capture to create their product. Here are some examples in their vault.
The characters used are called Signing Avatar’s and they’re owned by Vcom 3D. They are created digitally and their job is to turn speech into sign language. There becoming more and more popular and it is though that they will soon be used on television and the web to make it more accessible to deaf and hard of hearing users. There is a shortage in deaf communicators and whilst these Signing Avatars have not been created to replace them, they do generally offer a wider range of vocabulary to teach deaf and hard of hearing people. Here is a Signing Avatar in action.
Sign Smith - ASL animations
ASL (American Sign Language) animations, seems a great animated interactive CD for teaching sign language to deaf or hard-of-hearing people. This is according to these user quotes. The sources are from teachers therefore they are deemed to be authoritative. The information is also on the link above.
"As a middle school teacher, I look for resources that will help my deaf and hard of hearing students excel in all areas and will be easily integrated into my teaching. ASL Animations provides so many options - I can use them for testing, vocabulary practice, instructional use and create my own presentations for each curriculum unit. The animations are clearly understandable; the size is large enough for clarity, still small enough for an easy download; the signs are accurate; and the transitions clearly show the beginning and end of each sign. By offering single cycle animations, 3-loop and infinite loop animations, the uses are endless. I will use the single cycle animations for independent reading projects and for testing. The looping animations will be extremely useful for my slower learners and writers, and good for the initial teaching of a sign. Let me know when the next volume is ready!"
Evelyn Holmberg, Teacher of the Deaf and Hard of Hearing
Marie H. Katzenbach School for the Deaf, Trenton, New Jersey
Marie H. Katzenbach School for the Deaf, Trenton, New Jersey
"I have always said - 'I look at each child and I don't see the difficulties, but rather a challenge; a puzzle for me to solve.’ In my 30 years of teaching, I have encountered many types of learning difficulties. It is not the fault of the child, rather the lack of resources available to the child. ASL Animations fills that gap for the student who is Deaf or Hard of Hearing. The movies fit into our programs beautifully and allow the child to see their native language paired with the English language they are struggling to learn to read and write. At SoftTouch, we strive to provide products that will allow students to learn creatively. Adding ASL Animations to our list of products lets us do that with even more students."
Valerie Laird, CEO
Crick Software Inc., Redmond, Washington
The ASL animations programme includes many activities that aid in learning sign language including:
- Develop an activity in which students must put the signed words in the correct order (e.g. calendar items – months, weekdays, seasons, etc.)
- Match the signed animation to the appropriate English word
- Associate a concept to related images or words
- Fill in the correct words in context of an English sentence
- Introduce words within specific categories (feelings)
- Identify English synonyms for the displayed signed animation
- Identify English antonyms for the displayed signed animation
- Practice recognition of multiple meaning English words. Display the English word and the variations of sign animations (can, can1). Ask students to write or demonstrate in sign or orally sentences using the signs in context
- Provide sentences that contain multiple meaning words. Ask students to identify the correct signed animation to match the context of the sentence
- Adapted Digital Books, support vocabulary items within a digital book (PowerPoint or IntelliPics Studio) with signed animations
Sign Smith - Sign Smith Studio
The link below will take you to another product created by Sign Smith this product Sign Smith Studios.
Sign Smith Studio is another recognized animated product that uses the Signing avatar however they approach the teaching of sign language in a different way to ASL animations, whereby they let the viewer create sentences using words and then see them acted out in sign language. This is a YouTube clip of one created using the Sign Smith Studio software. This is more useful for someone who is teaching sign language as oppose to someone who is learning it
The link below takes you to a demo of how the Sign Smith Studio software works
British Sign Language foundation
Heres what the BSL foundation (British Sign Language) had to say upon the subject matter after they recieved an email. They provided some helpful links. The bold text is thoughts taken away from their answers.
1. How helpful do you think an animated product be in terms of
teaching young children sign language?
Depending upon the quality of the animation - very useful! Are you
aware that over 90% of deaf children are born to hearing parents who
have no (or very little) experience of deafness. So if a family
choose to sign to their son/daughter then in effect the whole family
learn together.
Therefore the product needs to be relatable to both hearing and deaf people, so sound and writing are still essential elements within a product such as this.
2. What are the main techniques/methods to teach sign language to
young children?
I am not sure of hearing children but Deaf children access videos,
DVD's and learn from school.
This source suggests that most learning of Sign Language is done via interactive media such as DVD’s and CD roms. This means there are products available and in use.
3. Have you seen or do you use any similar products on the market or
NHS?
Not really but there are avatars- http://www.visicast.co.uk/demo/tessa/tessa_demo.htm
This refers to the Signing Avatars that are in the reviewed products.
4. Are there any useful websites I should be looking at?
For info on Deaf and loads of sign - http://www.signstation.org/
This site is useful for a beginner and would serve a great purpose when learning and creating sign language. The many facts give ideas as to what could be involved in a teaching product.
5. Can you think of any important methods of teaching sign language I
would need to include in a product like this?
You will need a Deaf person who is native in the language to assist
and develop the curriculum.
It seems the best way to learn methods of teaching Sign language is to learn it yourself or observe and witness deaf people learning it. A few days in a deaf school would certainly benifit when designing and creating a product like this.
An after thought mentioned was "The face holds a great deal of grammatical information - so it needs
to be clear." .
After researching products already on the market, it would seem that there is still a gap for a product aimed specifically at teaching young children sign language. ASL Animations and Sign Smith Studio seem like fairly advanced learning software and, based on the product demo above, doesn’t really appeal to children. A package that is aimed at younger children could be marketed at a lower price and be sold as a one on one interactive CD (with parental guidance) or as a software to teach entire classes. The Signing Avatars are a really good idea and could benefit a similar product aimed at younger children however with today’s technological advancements the characters could still look and be animated in a more realistic fashion. Educational shows and characters such as the ‘Teletubbies’ and ‘Tweenies’ have proved that fictional characters are often the way to go when interacting with children. For that reason it is my conclusion that perhaps a fictional Signing Avatar would benefit a product aimed at young children. Creating you own sentence is a good idea for more advanced users and simpler sentences could feature in a product aimed at younger children. The thoughts given by the British Sign Language foundation make it quite clear that a product like this could be useful and confirm the use of Signing Avatars
Analyse ways in which the hand can be animated and how it is done so in industry
The video above demonstrates how they capture the motion data necessary to create their product. As you can see they use motion capture and have half body models that they use as characters. This seems very beneficial as they can really synchronise hand movement with facial expression and body movement, all of which play a key role in sign language. Obviously there is a lot of technology here that a university student is unable to use; however given the chance there are many advantages with motion capture. Motion capture is now a technique that is used more and more in the animation industry and so using it as a technique for capturing accurate sign language seems appropriate. Also once it’s all set up it is a very fast way of capturing a lot of data in a short period of time. A disadvantage of motion capture is that more often than not, you trying to apply someone else’s actions onto a fictional character. So if you can’t find someone who can act it out exactly the way it is needed you don’t get your wanted results.
This is oppose to key framing which allows you to make a character move in any way you wish. The down side to key framing is that it is very time consuming. Here are some examples of the hand in action. Each render is Key framed and wasn’t too difficult however time consuming. Every sign starts from the same position as this gives the user somewhere to start from when creating a sign. The bones were key framed individually and the sign takes longer to make to give a younger person more chance to see how it is created in slower motion. The sign also holds for a while for the same reason.
A
B
C
D
E
F
This first render shows the hand flattening and grasping. It was key-framed and notice the subtleties within the animation such as the skin stretching slightly over knuckles and the wrist as it flex's up. The thumb was the hardest to rig and animate as the muscle that connects it to the palm (abductor pollicis brevis) is thicker and creases slightly on this render. (See videos below)
Another method used by animators is morph targets, this could work really well for lip synchronisation. It is more difficult to use morph targets on elements such as fingers as the mesh has to be moved vertices by vertices. Depending on the mesh, morph targets can lead to inaccurate results as the timing of words still must be key framed with the audio, where as motion capture takes the data straight from the face. There is no substitute for the real thing in this case. For prototype reasons however a basic mesh will fit the criteria. Below is an example of a basic head and the mouth moving morph targets. (see photographs and videos below)


Facial rigging data is caught using motion capture and it works really well. Based on information found, regarding the teaching of sign language, it seems a necessary aspect to have as apart of teaching sign language. To keep diversity and to help every ethnic background relate to the animation, there are a number of characters to be chosen all of which are of different genders and ethnicities. This is useful as children of learning disabilities can sometimes take information as literally as it is given to them and could well mistake one ethnicity as being the only ethnicity able to communicate sign language.
This video shows a very similar method to capturing the animated data necessary to create a sign language product. Motion capture is the most popular method as it is fast and accurate. When creating a product such as this, motion capture should be the main technique used to animate the character/Signing avatar.
Conclusion